Special techniques |
Elimination of limb darkening
The limb darkening can pose problems when making position or area measurements. Its elimination allows solving these problems, and gives more freedom when it comes to varying the intensity levels of the image, favoring the visibility of very weak structures that would otherwise go unnoticed.
The Fitswork program can perform the operation through the Processing menu, Background flatten, Flatten sun disk. The process takes place completely automatically and without any control, so it does not always give a good result. Iris is more powerful, allowing different parameters to be varied, and even optimizing the result with other tools of the program.
We open in Iris the image we want to treat. The first operation consists of determining the center and radius of the solar disk (Xc, Yc, R). For this, in the "View" menu ("Visualization") we mark "Slice" ("Coupe"). This option is used to measure the intensities along a line. Holding down the left mouse button, we draw a line that crosses the entire disk, and when you release it, a graph with these intensities will appear:

With the help of the graph, we must choose the intensity that best defines the edge of the disk. In this example, a value of 200-250 can serve us perfectly. Next we draw on the image a box that contains the disk and execute:
>circle 200
where 200 is the intensity chosen. In the window "Output" ("Sortie") the searched data will appear.
Then we need the intensity of the center of the disk. We boxed the central area, clicked with the right button and chose "Statistics" ("Statistiques"). A window will appear where we can see the maximum intensity I0. With these data we execute:
>synthe_sun Xc Yc R L I0
The L parameter is the wavelength in nanometers (the limb darkening depends on the wavelength). If we are using a digital camera, L can be around 550 nm, but the best thing is that we obtain this value with successive tests.
The result of the >synthe_sun command is a synthetic image of the disk, in the same position, with the same size, and the same intensity as the original solar disk; and that only contains the limb darkening. We save the image:
>save s
Then we load the original image again and subtract the synthetic image with the >sub command:
>sub s 10000
10000 is a normalization value (the average intensity of the final image). To improve the visualization we can vary the intensity levels and cut the sky background with:
>disk2 Xc Yc R
Optimization of the previous method
Due to the presence of clouds or the vignetting of the optics, the above procedure does not always produce a flat disk. With the following method we can improve the result.
We open the image resulting from the previous process and we do:
>bin_up i
>save mask
where i is an intensity somewhat higher than the sky background, but less than any intensity of the disk. With this we create a mask that isolates the disc from the sky background.
We open the image again and go to the Processing menu, Remove gradient (polynomial fit) ... (Traitement, Retrait du gradient (estimateur polynomial) ...). In the window that opens, we mark "Use a mask" ("Use a mask") and put on the right the name of our mask. When we give OK, the program selects a set of points on the disk, with which it makes a model of the gradients and applies it to the image. We will see the result when saving the image:
>save result
As in the previous case, we can vary the intensity levels and cut the sky background.
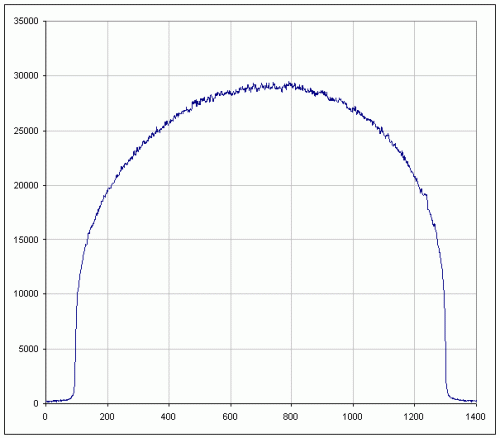
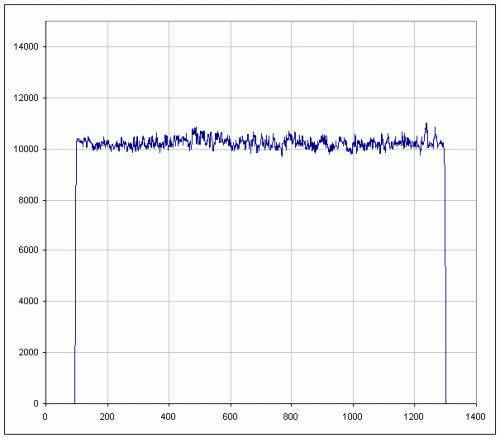
In the graphs, a cut of the disc can be seen before and after subtracting the limb darkening. Fluctuations seem higher in the second because it has normalized to a lower intensity. On the right there is also the corresponding signal to faculae
 |
 |